Translate this page ▼▼

Manchester Astronomical Society
Established 1903
High Resolution Moon Imaging

with a simple digital camera
by Kevin Kilburn, F.R.A.S.
In the past five years amateur astronomical photography has been revolutionised by the availability of digital cameras. There have been many articles published in the popular astronomy magazines covering most aspects of this, including video imaging, digital stills imaging and Webcam photography. The latter really came into prominence during the opposition of Mars in August 2003 when amateurs using cheap Webcams and image stacking and processing software, like RegiStax, produced still pictures that exceeded the quality of professional pictures taken less than a decade earlier. To enable the interception of a light cone from the telescope and to focus directly onto the sensor, the standard Webcam lens is removed. The telescope replaces the normal wide-angle lens and acts as a super-telephoto giving very high magnification. Registax, developed by its author Cor Berrevoets, is downloadable free-ware that has transformed Webcam imaging into perhaps the most powerful tool to date for high-resolution lunar and planetary photography.If Webcam imaging has any drawback, it is the need to have a cheap Webcam connected to a relatively expensive laptop computer or a dedicated desktop computer close to the telescope in an observatory, to capture the AVI files necessary for RegiStax to process into hi-res stills. This implies costly investment in a laptop computer or a small observatory, or both.
Of course a stand-alone option is to use a digital point and shoot camera costing less than £200 (Dollar equivalent in the USA). Having non-removable zoom lenses, these cameras need to be used in an afocal setup that involves pointing the camera into the telescope eyepiece pre-focussed at infinity. The camera lens then intercepts the parallel light pencil exiting the eyepiece much in the same way that the observer's eye would. This is OK for taking individual shots of the moon and planets but is still limited to relatively short exposures dictated by atmospheric seeing, telescope tracking accuracy and the necessarily low magnification needed to ensure a bright enough image to be presented to the camera. The results are often very good and usually better than anything taken with 35mm film cameras.

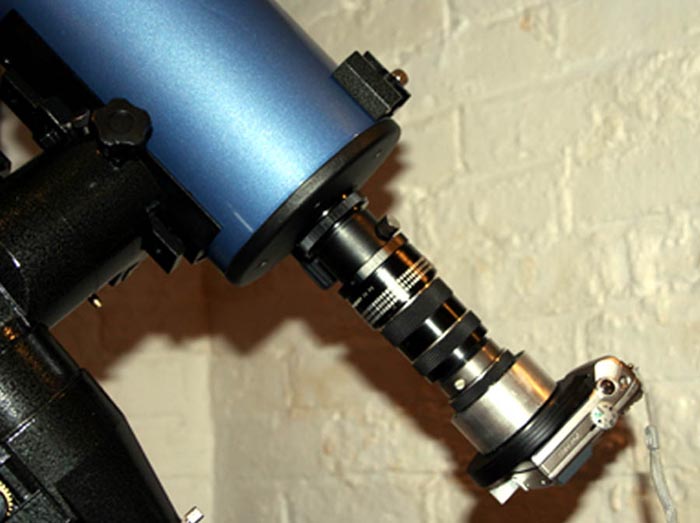
General view of the projection unit linking the telescope with the camera. Image © Kevin Kilburn
However, most digital still cameras will also take short duration movie files. These can be used to produce hi-res RegiStax pictures similar tothose taken with a Webcam. My two year old 5Mb Nikon Coolpix 5200 will take over 600 stills on a 1Gb memory card or more than eleven minutes of imaging in the highest quality TV video mode. Used afocally on a 127mm (5-inch) SkyWatcher Maksutov-Cassegrain telescope, fitted with a home made tele-extender giving high optical magnification, I can take up to twenty, 30-second, MOV files during an observing session. Converted to AVI files, these are processed on RegiStax to produce images that can attain 1-mile resolution on the surface of the moon. This is close to the theoretical resolving power of such a small telescope and produces permanent images far better and with greater clarity than I have rarely seen visually with a much larger instrument; my old 12-inch Newtonian. My lunar astronomy has taken a turn for the better. I now sit comfortably at my computer and can really study the lunar surface.
The Coolpix in video mode automatically adjusts the exposure and gives a far wider range of accommodation than a single snapshot would produce. Bright areas of the moon are not burned out whilst shadows retain detail that can be brought out in subsequent image processing.The technique is not without its drawbacks. The 1Gb camera memory card holds about twenty compressed MOV files that are downloaded to my computer hard-drive. I then use the share-ware, Smartsoft Video Converter, to change the MOV files to AVIs. Unfortunately, Registax still cannot use this format without further modification to old format AVI files and I thank Cor Berrevoets who suggested using another free-ware, VirtualDub, to do this final conversion.
Furthermore, each 30-35-second compressed MOV file converts to an uncompressed 700-800Mb AVI file and they rapidly mop up hard drive space and can severely compromise your computer. The way around is to save the compressed MOVs to CD or DVD, (and deleting them from the hard drive) and then converting them individually from the CD to AVIs immediately before processing them on RegiStax to Bitmap images. Convert and process no more than four or five AVIs at a time then delete them from the hard-drive before they accumulate too much disk space. Converting from MOV to AVI, then to old AVI files, takes about 20 minutes on my 650MHz, Pentium3 computer with 1Gb RAM. Processing the 800-1000 frame AVI files on RegiStax takes another 10 minutes and a then further 10 minutes on Photoshop is needed; but the result is worth the effort.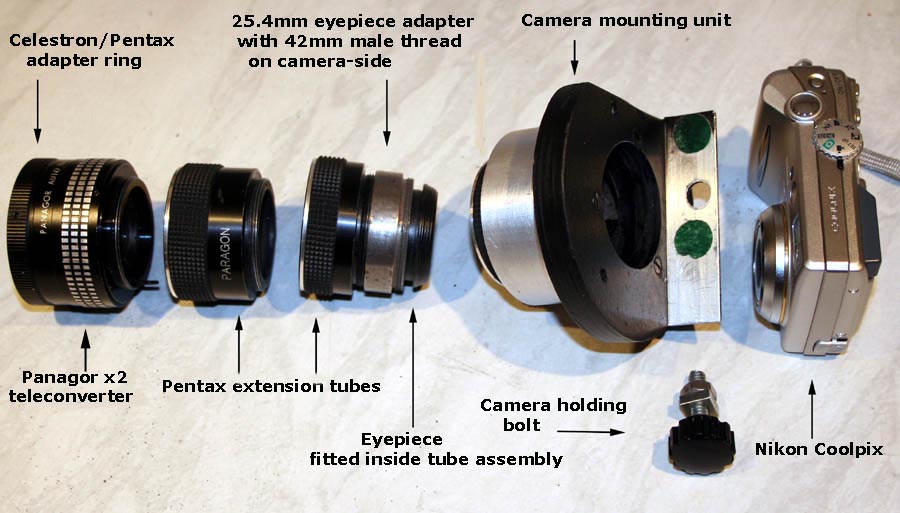
Exploded view of the projection unit assembled from off-the-shelf components plus a bit of DIY Image © Kevin Kilburn

The key to the success of this technique is to present a highly magnified optical image to the camera, video it and then use computer software to do the image processing. My 127mm Mak-Cass telescope has a focal length of 1500mm. Photographically it is basically working at 1500/127 = f 11.8 but it is necessary to increase the focal length and hence the magnification and f-ratio by a very considerable amount to get the optimal resolution, the number of arcseconds per pixel resolved by a particular optical system, in the final image [1]. I use a x2 telenegative lens, fitted to the telescope by a Celestron adapter, to double the focal length to 3000mm and increase the f-ratio to 3000/127= 23.6. Image brightness immediately drops by a factor of four, the square of the amplification. An eyepiece of either 25mm focal length or one of 10mm then intercepts this new exit cone. I prefer the latter for optimal resolution [2]
The camera lens is set as near as possible to maximum optical zoom and is limited only by the eyepiece sticking backwards into the camera mounting unit which can interfer with the forward movement of the Nikon's lens (retracting the rubber eyecup on the eyepiece reduces this interference). Maximum zoom minimises vignetting (field cut-off, especially at the corners of the image) from the eyepiece. The camera lens views the parallel light exiting the eyepiece. The telescope focussing gives ample back-focus to enable a crisply focussed but highly magnified image to be viewed on the camera screen. Although the image becomes increasingly dimmed by the high magnification and high focal ratio, the automatic through the lens video capture takes care of this by increasing the low-light sensitivity.Pressing the shutter button starts the video capture sequence albeit with some camera shake that quickly damps. After 30 seconds the button is pressed again to stop the imaging, again with some shake. These shaky frames are automatically discarded when the AVI is processed on RegiStax. In my current setup, the resultant field of view is about 3 arcminutes wide, one tenth of the moon's apparent diameter, equating to about 260 miles across near the centre of the lunar disk. In 640x 480 pixel TV mode the resolution is about 3.5 pixels per arcsecond or about 2.5 pixels per mile, a reasonably good match for the theoretical resolution, 0.9 arcsecond, of the 127mm telescope. Even with moderately poor seeing, lunar details less than 3 miles across are resolvable.
RegiStax follows and registers not only the atmospherically turbulent image but also follows any tracking errors in the RA drive of an unguided SkyWatcher EQ5 mounting. Trial and error image processing on RegiStax showed that wavelet-processing bottom up gives the best results. The six levels of wavelet manipulation are ranked top down from the smallest details to the largest. I found that if level six, the coarsest, is set at 25, level five at 15 and level four at 10, this gives a substantial gross improvement to the image without the 'orange peel' effect that can be introduced by the more delicate levels; although these should be experimented with. Saving the image as a bitmap file, final processing on Photoshop CS2 to adjust the autolevel and shadow/highlights brings out extra detail.
The results speak for themselves. These images were taken under atmospheric seeing conditions ranging from poor to medium. Since I started lunar video imaging in February 2006, I have yet to experience high quality seeing conditions. I hope to do better.
Aristarchus
Petavious
Theophillus
Torricelli
Atlas
References
[1] Defined by Robert Reeves in his Introduction to Webcam Astrophotography. Willmann-Bell. May 2006.
[2] My 25mm eyepiece will only show 1-mile craters as a single pixel, and a single pixel cannot show any detail…technically, this is undersampling. The resolution is too low because it needs the contrast between at least two adjacent pixels to show lunar detail. Higher magnification is needed, hence the preference for the 10mm eyepiece.
© Copyright (1999) Kevin J Kilburn
All images © K Kilburn